Google’s smart displays (formerly Google Home Hub, now Nest Hub) are designed as countertop devices, but with a bit of DIY spirit, they can be transformed into a sleek, dedicated wall-mounted control panel for your smart home. This approach centralizes control of your lights, thermostats, and cameras while also serving as a digital photo frame.
Here is what you need to know about turning a Nest Hub into a command center.
1. Why Mount a Nest Hub on the Wall?
While voice control is convenient, having a dedicated visual dashboard offers distinct advantages:
- Glanceable Information: See the weather forecast, time, and upcoming calendar events without pulling out your phone .
- Centralized Control: Quickly adjust thermostat temperature, turn lights on/off, or view doorbell camera feeds with a single tap on the screen.
- Clean Aesthetic: Eliminates counter clutter and hides the power cord inside the wall for a built-in look.
- Ambient Mode: When not in use, it becomes a smart photo frame displaying Google Photos albums, blending seamlessly into your home decor .
2. Hardware Requirements & Design Considerations
Before drilling holes, understand the specific needs of the 1st Gen Home Hub or Nest Hub (2nd Gen) :
- Power Over Clutter: The device does not support Power over Ethernet (PoE) or battery operation. You will need to route the proprietary power barrel jack through the wall. A recessed outlet behind the mount is the cleanest solution.
- Viewing Angle: The 7-inch screen has good viewing angles, but it lacks the wide “approach angle” of premium tablets. Mount it at roughly chest-to-eye level in hallways or kitchens where you will stand close to it.
- Microphone Access: Ensure the wall mount you choose does not block the two far-field microphones on the top edge. Blocking these will render “Hey Google” commands useless .
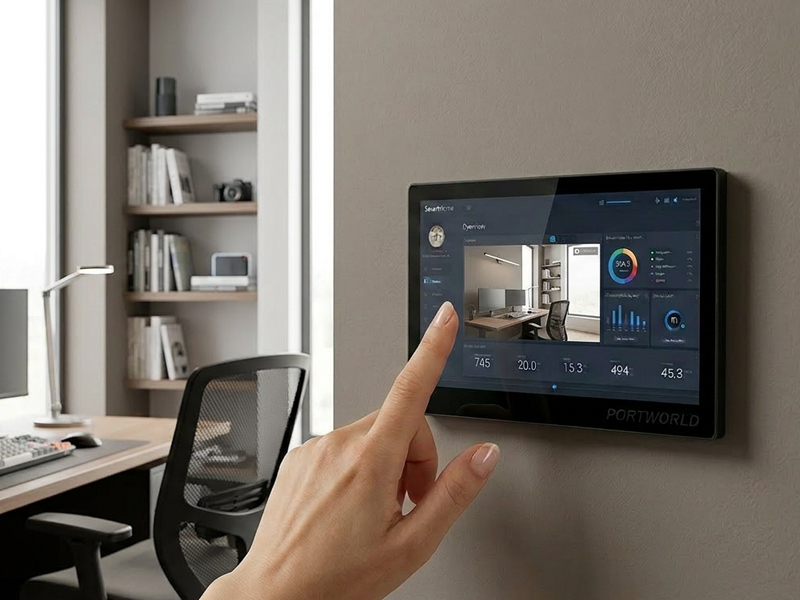
smart home control panel-1
3. Choosing the Right Wall Mount
Since the Nest Hub is a consumer product with no official first-party wall mount, you will rely on 3D printed or third-party solutions. The most functional designs share these features:
- Recessed Power Cutout: A slot behind the “cup” that holds the Hub allows the DC power plug to enter without pinching or tilting the device .
- Breathability: The mount should leave a small air gap between the device back and the wall. While the Nest Hub is passively cooled, trapping heat behind the screen can reduce its lifespan.
- Screw Covers: Look for designs with hidden screw holes or included covers to maintain that “built-in” look .
Portworld’s smart home control panels are fully compatible with devices like the Nest Hub, offering a seamless control and integration experience. By adopting standard protocols and compatible technologies, such as the Matter protocol, Zigbee, and Wi-Fi, Portworld’s devices can interconnect and be remotely controlled with platforms like Google Nest Hub.
Specifically, Portworld’s smart control panels, such as the YC-SM41P and YC-P5, can interact with the Nest Hub through apps or voice assistants, enabling the following features:
- Voice Control: Through Google Assistant or Amazon Alexa, users can give voice commands via the Nest Hub to directly control Portworld’s smart home devices.
- Cross-Device Control: Whether it’s lighting, security systems, air conditioning, or curtains, users can manage all connected devices through the Nest Hub, allowing for centralized control of Portworld’s panels.
- Unified Management: With the Google Home app, users can integrate Portworld’s smart panels with the Nest Hub and other devices into a single smart home system, enabling personalized scene settings and automation.
- Remote Control: Users can remotely control Portworld devices using the Google Home app, whether they are at home or away, enjoying the convenience that smart home technology provides.
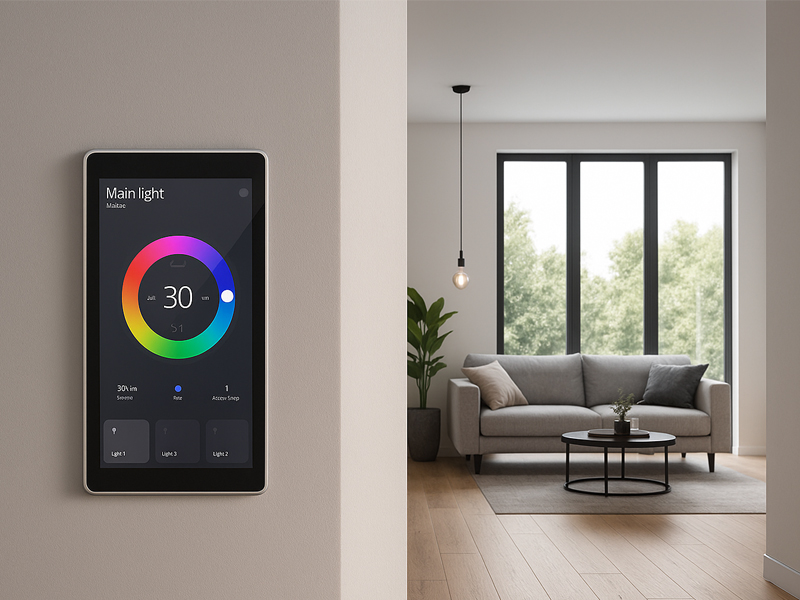
smart home control panel7
1. Embedded Installation (For Wall and Switch Boxes)
- Applicable Products: YC-SM41P, YC-P5, etc.
- Steps:
- Choose Installation Location: Select a location that’s easy to operate and view, such as a wall switch box or a fixed installation area.
- Power and Network Connection: Ensure there is a proper power outlet and network connection. Portworld panels support 48V PoE (Power over Ethernet) and DC 12V input, so choose the appropriate power method.
- Install Base: Use the included mounting base or bracket to securely attach the control panel to the wall or device box.
- Network Setup: Connect the panel to the network via Ethernet or Wi-Fi to ensure communication with the Nest Hub and other smart devices.
- Final Installation: After securing the panel and connecting power and network, proceed with necessary system configuration to ensure compatibility with the Nest Hub.
2. Desktop Installation (For Desktops or Countertops)
- Applicable Products: YC-SM41P, YC-P5, etc.
- Steps:
- Choose Installation Location: Place the control panel on a desk or countertop where it can be easily operated and seen.
- Power Connection: Connect the DC power or use PoE Ethernet power (requires PoE switch or adapter).
- Network Setup: Connect to the network via Wi-Fi or wired Ethernet to integrate into your home network.
- Device Setup: Use the touchscreen or companion app for initial setup and testing to ensure the device can control other smart home devices.
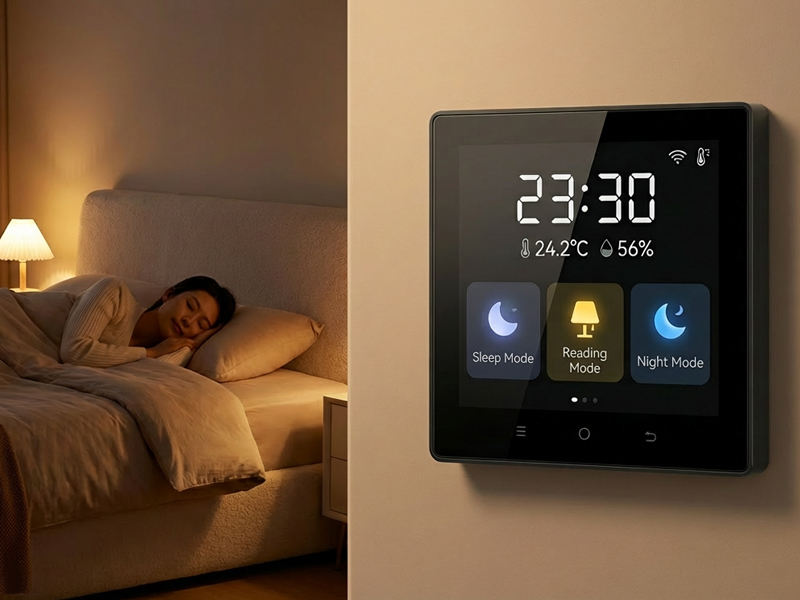
3. Wall-Mount Installation (For Indoor Walls or Offices)
- Applicable Products: YC-P5, YC-SM41P, etc.
- Steps:
- Select Wall Position: Choose a wall location that allows easy access and clear visibility of the screen, ensuring good signal reception for the Nest Hub and other devices.
- Install Mounting Bracket: Use the included bracket to mount the control panel securely on the wall. Depending on the design, it can be mounted horizontally or vertically.
- Power Connection: Ensure safe power connection to a nearby power socket or use PoE for power through Ethernet.
- Network Setup: Connect the device to your Wi-Fi network or wired Ethernet for seamless integration.
- Calibration and Configuration: Once the installation is complete, use the control panel or app to configure and ensure compatibility with the Nest Hub and other smart devices.
smart home control panel1
4. Integration with Nest Hub and Device Pairing
- Device Linking: Once installation is complete, open the Google Home app and select “Add Device” to pair the Nest Hub with the Portworld control panel.
- Voice Assistant Setup: Ensure Google Assistant is enabled on the Nest Hub, and add the Portworld control panel to your smart home setup. This allows you to control all connected smart devices via voice commands.
- App for Device Management: Portworld offers a dedicated app for centralized control and management. Through the app, you can monitor and control the connected devices, ensuring smooth interaction with the Nest Hub.
Tips for Smooth Installation:
- Ensure Compatibility: Portworld devices support Google Home, Alexa, and the Matter protocol, ensuring seamless integration with Nest Hub and other smart platforms.
- Remote Control: Once the devices are connected, users can control all smart home devices through voice or app, enhancing user experience and convenience.


